linux安装LNMP的安装方法
最近在安装linux lnmp centos7环境的时候还是有点小问题,从头总结了一下。
安装的版本是 nginx 1.12 mysql 5.7 php 5.6
一,安装nginx
1,使用putty或者其他工具登录系统。

[root@localhost ~] ip addr
获取ip 后登录putty,方便操作。
-
[root@localhost ~]# yum install wget gcc gcc-c++ pcre-devel zlib-devel openssl openssl-devel
[root@localhost ~]# cd /usr/local/src/
[root@localhost src]# wget http://nginx.org/download/nginx-1.12.2.tar.gz
*解压
[root@localhost src]# tar zxvf nginx-1.12.2.tar.gz
/****** 取消Debug编译模式 START*******/
#在编译nginx时,默认会以debug模式来运行,取消debug的好处是编译后的nginx更加小巧,编译更快。
[root@localhost src]#cd nginx-1.12.2
[root@localhost src]vi auto/cc/gcc
编辑用 vi 或者 vim
#将这句注释掉 取消Debug编译模式 大概在172行 #CFLAGS="$CFLAGS -g"

/ **********取消Debug编译模式 END**************/
3. 预编译
[root@localhost nginx-1.12.2] ./configure --prefix=/usr/local/nginx --with-http_ssl_module --with-http_v2_module --with-http_stub_status_module --with-pcre --with-http_dav_module --with-http_addition_module --with-http_sub_module --with-http_flv_module --with-http_mp4_module回车后会加载很多东西
解释:
--prefix= 指向安装目录。
--with开头的,默认是禁用的(没启动的,想使用的话需要在编译的时候加上)
--without开头的,默认是启用的(不想启用此模块时,可以在编译的时候加上这个参数)
--with-http_gzip_static_module :支持压缩(./configure:error:ivalid option。)
--with-http_stub_status_module :支持nginx状态查询
--with-http_ssl_module :支持https
--with-pcre :为了支持rewrite重写功能,必须制定pcre
--with-http_dav_module #启用支持(增加PUT,DELETE,MKCOL:创建集合,COPY和MOVE方法)
--with-http_addition_module #启用支持(作为一个输出过滤器,支持不完全缓冲,分部分相应请求)
--with-http_sub_module #启用支持(允许一些其他文本替换Nginx相应中的一些文本)
--with-http_flv_module #启用支持(提供支持flv视频文件支持)
--with-http_mp4_module #启用支持(提供支持mp4视频文件支持,提供伪流媒体服务端支持)
(make -j 4 && make install 4核编译)
4. 执行编译安装
[root@localhost src]# make && make install
make是编译的意思。就是把源码包编译成二进制可执行文件
make install 就是安装的意思。
回车后会加载很多东西
5.添加系统变量(方便启停服务)
[root@localhost nginx-1.12.2]# vi /etc/profile
我一般是在56行新增代码 export PATH=/usr/local/nginx/sbin:$PATH
a键进入编辑行,按ESC键 后 :wq 保存退出
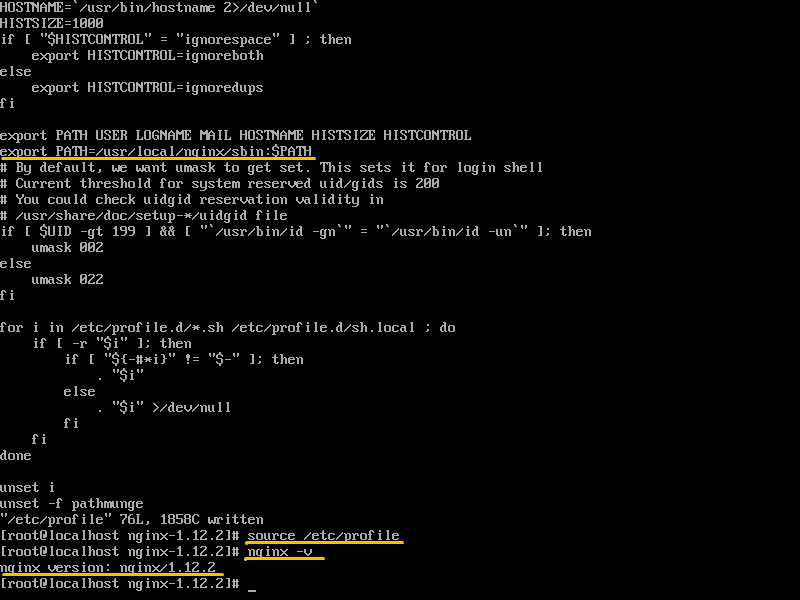
*重启配置(上图)
[root@localhost nginx-1.12.2]# source /etc/profile
*查看nginx版本信息(上图)
[root@localhost nginx-1.12.2]# nginx -V
*添加软链
[root@localhost nginx-1.12.2]# ln -s /usr/local/nginx/sbin/nginx /usr/local/sbin/
*生成服务启动脚本
把下面的代码一字不落的输入。#号后面的也是必须的,否则报错:bash: chkconfig: command not found
[root@localhost nginx-1.12.2]# vi /etc/init.d/nginx
# chkconfig: - 99 2# description: Nginx Service Control ScriptPROG="/usr/local/nginx/sbin/nginx"PIDF="/usr/local/nginx/logs/nginx.pid"case "$1" instart)$PROG;;stop)kill -3 $(cat $PIDF);;restart)$0 stop &> /dev/nullif [ $? -ne 0 ] ; then continue ; fi$0 start;;reload)kill -1 $(cat $PIDF);;*)echo "Userage: $0 { start | stop | restart | reload }"exit 1esacexit 0
*配置服务开机自动启动
[root@localhost ~]# chmod +x /etc/init.d/nginx
[root@localhost ~]# chkconfig --add nginx
[root@localhost ~]# chkconfig nginx on
*首次启动
[root@localhost ~] /usr/local/nginx/sbin/nginx
*检查是否启动成功:
打开浏览器访问此机器的 IP(看下图:ip addr 回车后找到inet),如果浏览器出现 Welcome to nginx! 则表示 Nginx 已经安装并运行成功。
nginx启动成功但浏览器无法访问解决办法
如下图一样报错。
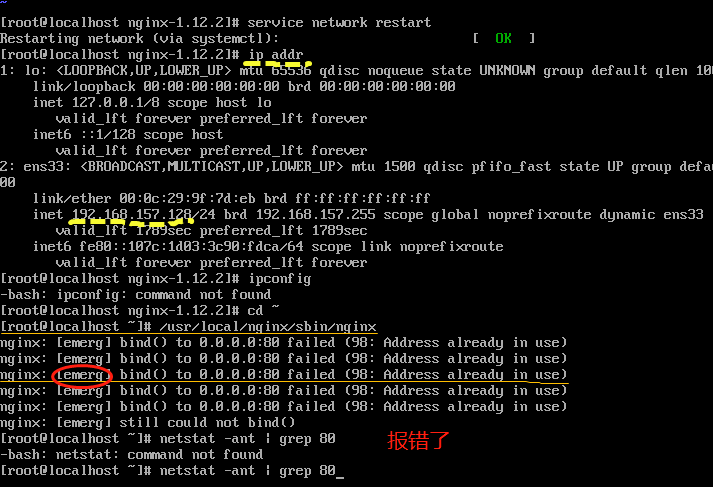
查找占用端口:
[root@localhost ~]netstat -ltunp
netstat 用于检验本机各端口的网络连接情况。
[root@localhost ~] /usr/local/nginx/sbin/nginx -s stop
[root@localhost ~] /usr/local/nginx/sbin/nginx
其他命令:
重启:
[root@localhost ~]# /usr/local/nginx/sbin/nginx -s reload
停止:
[root@localhost ~]# /usr/local/nginx/sbin/nginx -s stop
测试配置文件是否正常:
[root@localhost ~]# /usr/local/nginx/sbin/nginx -t
强制关闭:
-
[root@localhost ~]# pkill nginx
*开机自启动
即在rc.local增加启动代码就可以了。
[root@localhost ~]# vi /etc/rc.local
增加一行 /usr/local/nginx/sbin/nginx
设置执行权限:
[root@localhost ~]# chmod 755 /etc/rc.local
二、安装mysql 5.7
用的是rpm 好处是不用配置那么多东西 。 配置不用管。
1,下载rpm
[root@localhost ~]# cd /usr/local/src/
[root@localhost src]# wget http://repo.mysql.com/mysql57-community-release-el7-8.noarch.rpm
[root@localhost src]# rpm -ivh mysql57-community-release-el7-8.noarch.rpm
2,下载mysql
[root@localhost src]# yum -y install mysql-server
(也可以指定安装目录 yum --installroot=/usr/local/mysql --releasever=/ -y install mysql-server 可以自己研究)
根据步骤安装就可以了,
默认配置文件路径:
配置文件:/etc/my.cnf
日志文件:/var/log/var/log/mysqld.log
服务启动脚本:/usr/lib/systemd/system/mysqld.service
socket文件:/var/run/mysqld/mysqld.pid
3,启动mysql服务
[root@localhost src]# service mysqld restart
(systemctl restart mysqld.service)
4,重置密码
(1) 获取mysql 密码
[root@localhost ~]# grep "password" /var/log/mysqld.log

(2)登录mysql
[root@localhost src]# mysql -u root -p
上图有原始密码 然后进入 第一次登陆 ,需要重置密码 要不什么也不能操作
a,重置密码: 必须包含 数字、大小写字母、符号
mysql> alter user 'root'@'localhost' identified by 'Root!!2018';
3 开启mysql的远程访问可以连接navicat
执行以下命令开启远程访问限制(注意:设定IP是 192.168.0.1,只有该ip可以连接,如要开启所有的,用%代替IP,任何电脑都可以连接):
mysql> grant all privileges on *.* to 'root'@'%' identified by 'password' with grant option;
b,刷新权限
mysql> flush privileges;
 c,退出mysql,exit/quit
mysql> exit
4 为firewalld添加开放端口,连接navicat
添加mysql端口3306
[root@localhost ~]# firewall-cmd --zone=public --add-port=3306/tcp --permanent
[root@localhost ~]# firewall-cmd --reload
然后就可以连接navicat了
5 更改mysql的语言
首先重新登录mysql,然后输入
mysql> status
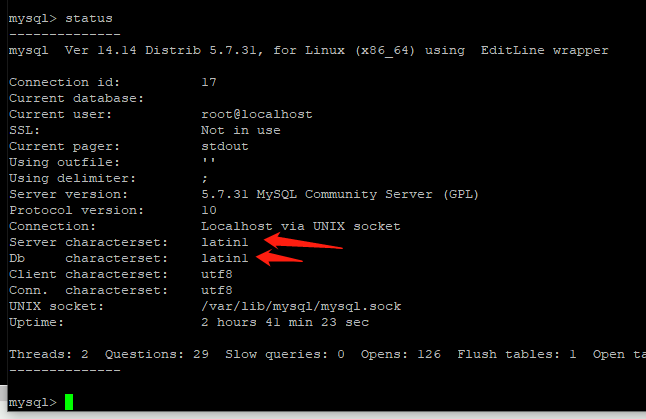
可以看到,箭头处不是utf-8
因此我们先退出mysql,然后再到 /etc/my.cnf文件下修改一下文件内容
mysql> exit
[root@localhost ~]# vi /etc/my.cnf
进入文件后,新增四行代码:
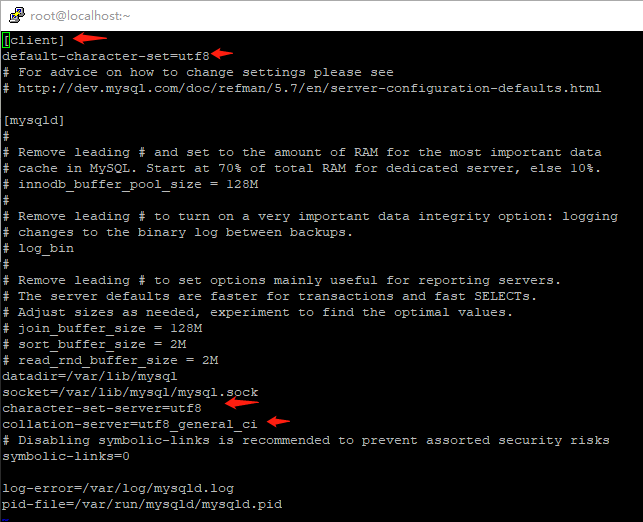
保存更改后的my.cnf文件后,重启下mysql,
[root@localhost ~]# service mysqld restart (systemctl restart mysqld.service)
然后登录mysql 输入status再次查看,你就会发现变化啦
三、安装php
需要的插件包
[root@localhost ~]# yum -y install gcc gcc-c++ libxml2 libxml2-devel bzip2 bzip2-devel libmcrypt libmcrypt-devel openssl openssl-devel libcurl-devel libjpeg-devel libpng-devel freetype-devel readline readline-devel libxslt-devel perl perl-devel psmisc.x86_64 recode recode-devel libtidy libtidy-devel epel-release libmcrypt-devel autoconf1.下载php
[root@localhost ~]# cd /usr/local/src/
[root@localhost src]# wget http://cn2.php.net/distributions/php-5.6.32.tar.gz
2.解压
[root@localhost src]# tar zxvf php-5.6.32.tar.gz
3. 预编译
  进入目录

		  [root@localhost src]
# cd php-5.6.32
创建php-fpm用户,并禁止登录;
[root@localhost php-5.6.32]# useradd -s /sbin/nologin php-fpm
   [root@localhost php-5.6.32]#  ./configure --prefix=/usr/local/php --sysconfdir=/usr/local/php/etc --with-config-file-path=/usr/local/php/etc/    --with-fpm-user=php-fpm  --with-fpm-group=php-fpm  --enable-fpm --with-mysql=mysqlnd --with-mysqli=mysqlnd --with-pdo-mysql=mysqlnd --with-mhash
--with-openssl --with-zlib --with-bz2 --with-curl --with-libxml-dir --with-gd --with-jpeg-dir  --with-png-dir --with-zlib --enable-mbstring --with-mcrypt --enable-sockets --with-iconv-dir   --enable-zip --with-pcre-dir --with-pear --enable-session
--enable-gd-native-ttf  --enable-xml --with-freetype-dir --enable-gd-jis-conv --enable-inline-optimization --enable-shared  --enable-soap --enable-bcmath --enable-sysvmsg --enable-sysvsem --enable-sysvshm  --enable-mbregex --enable-pcntl --with-xmlrpc
--with-gettext --enable-exif --with-readline   --enable-ftp   --enable-redis

php7版本正确的编译语句是:
   [root@localhost php-7.2.9]./configure --prefix=/usr/local/php
--with-config-file-path=/usr/local/php/etc --enable-fpm
--with-fpm-user=php-fpm --with-fpm-group=php-fpm --enable-mysqlnd
--with-mysqli=mysqlnd --with-pdo-mysql=mysqlnd
--enable-mysqlnd-compression-support --with-iconv-dir
--with-freetype-dir --with-jpeg-dir --with-png-dir --with-zlib
--with-libxml-dir --enable-xml --disable-rpath --enable-bcmath
--enable-shmop --enable-sysvsem --enable-inline-optimization --with-curl
 --enable-mbregex --enable-mbstring --enable-intl --with-mcrypt
--with-libmbfl --enable-ftp --with-gd --enable-gd-jis-conv
--enable-gd-native-ttf --with-openssl --with-mhash --enable-pcntl
--enable-sockets --with-xmlrpc --enable-zip --enable-soap --with-gettext
 --disable-fileinfo --enable-opcache --with-pear --enable-maintainer-zts
 --with-ldap=shared --without-gdbm
提示错误mcrypt.h没有找到,安装libmcrypt-devel包,默认的yum源,没有这个包,需要安装epel扩展源后,才可以安装。
[root@localhost php-5.6.32]# yum install -y epel-release
[root@localhost php-5.6.32]# yum install -y libmcrypt
[root@localhost php-5.6.32]# yum install -y libmcrypt-devel
再次执行./configure,没有错误提示,出现Thank you for using PHP,配置OK。
编译
[root@localhost php-5.6.32]# make && make install
编译时间有点长,几分钟吧。
完成后使用echo $?查看是否安装正确;
[root@localhost php-5.6.32]# echo $?
0
0表示上一步的结果成功。
配置文件
需要将当前目录下的php.ini文件拷贝到 php的安装目录etc下
[root@localhost php-5.6.32]# cp php.ini-production /usr/local/php/etc/php.ini
php.ini 文件是在包目录下的 php.ini-development(开发), php.ini-production(生产)
拷贝php启动脚本,php-fpm配置文件,更改php-fpm权限为755;添加php-fpm开机启动;
[root@ php-5.6.32]# cp /usr/local/src/php-5.6.32/sapi/fpm/init.d.php-fpm /etc/init.d/php-fpm (启动脚本)[root@ php-5.6.32]# mv /usr/local/php/etc/php-fpm.conf.default /usr/local/php/etc/php-fpm.conf (就是去掉了末尾的.default )[root@ php-5.6.32]# chmod 755 /etc/init.d/php-fpm [root@lphp-5.6.32]# chkconfig --add php-fpm [root@lphp-5.6.32]# service php-fpm start Starting php-fpm done
-------------------------------------------------------------------------------

如果出现上图的信息则使用 [root@lphp-5.6.32]chkconfig
查看php-fpm是否在服务中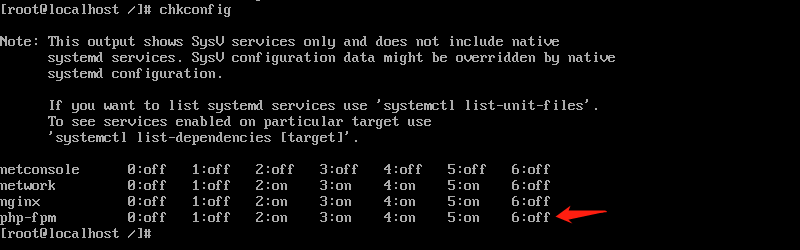
如果在则继续下面的指令
  [root@php-5.6.32]# chkconfig php-fpm on

			-------------------------------------------------------
将php的安装目录也加入到系统的环境变量 在最后一行加入
[root@php-5.6.32]vi /etc/profile
export PATH=/usr/local/php/bin:$PATH
重新加载source /etc/profile
[root@php-5.6.32]
[root@localhost ~]# php -v
PHP 5.6.32 (cli) (built: Mar 12 2018 17:43:15) Copyright (c) 1997-2016 The PHP Group Zend Engine v2.6.0, Copyright (c) 1998-2016 Zend Technologies
完成
接下来就是测试
-----php---安装成功
三、测试
在地址栏输入你的ip。然后测试PHP安装是否成功。确保nginx 和PHP都是运行的。
1.写测试页面
进入nginx的html
[root@localhost ~]cd /usr/local/nginx/html/
新增php文件
[root@localhost ~]# vi index.php
<?php
echo 'welcome here';
?>
2. 配置nginx
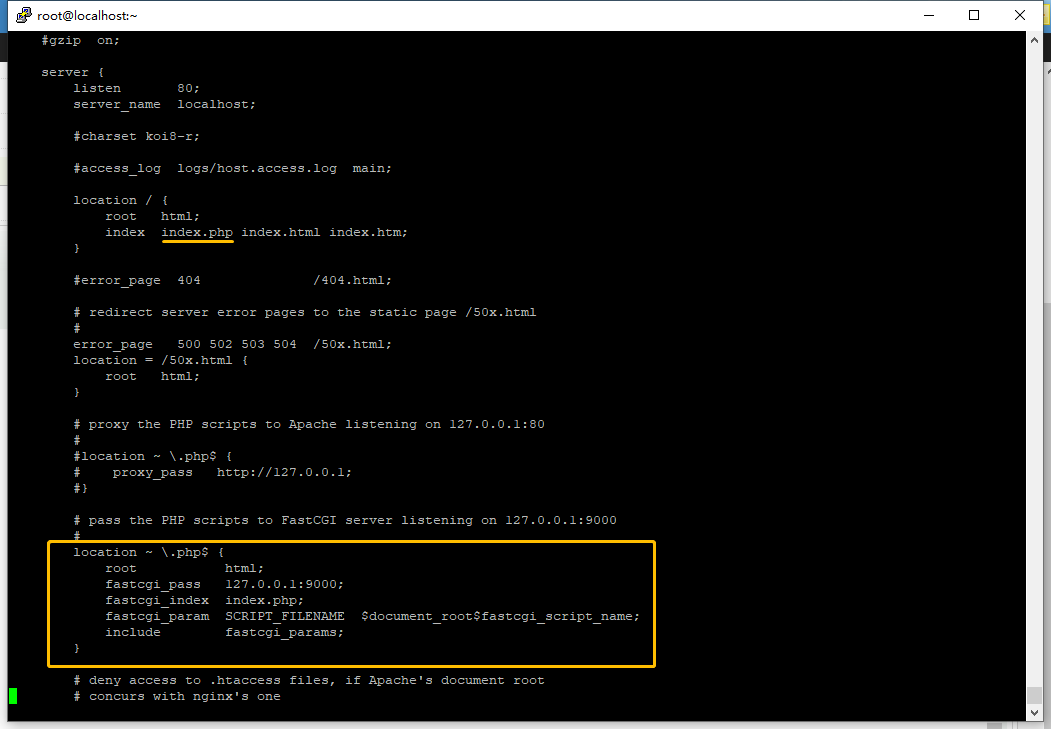
配置两个地方
[root@localhost ~]# vi /usr/local/nginx/conf/nginx.conf
找到 location 添加 index.php
将请求转给php的9000端口 确保nginx 和PHP都是运行的。
location ~ \.php$ {
root html;
fastcgi_pass 127.0.0.1:9000;
fastcgi_index index.php;
fastcgi_param SCRIPT_FILENAME $document_root$fastcgi_script_name;
include fastcgi_params;
}
9000端口是被监听的
[root@localhost ~]# netstat -antp | grep 9000
如果9000被监听刚重启nginx
重启nginx
[root@localhost ~]# /usr/local/nginx/sbin/nginx -s reload
浏览器看看页面文字发生变化了吗?
nginx添加站点部署网站
下一篇:nginx添加站点部署网站